News / August 23, 2022
Habitat at Home: Late Summer and Fall Native Plantings
Adding plants to your yard or garden doesn’t need to be just a spring thing. While April, May, and June are widely known to be a kick-off party for planting, fall is also a great time — the send-off party before cold weather comes.
In this blog post, we will cover why fall is a great time to plant, things to consider and actions to take before planting, and how to put your plants, shrubs, and trees in the ground. (Be sure to check out our how-to video below.)
Note: In general, it is best to give fall plantings about 4-6 weeks to establish before temperatures are below freezing for long periods of time, so keep that in mind.
Benefits of Fall Plantings
If you’re wondering why fall is a good time to plant, there are a few key reasons to keep in mind:
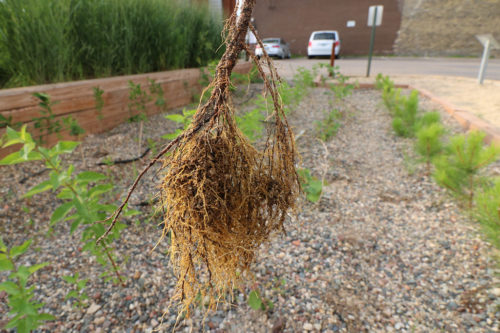
- Rooting is the main goal of fall planting. Whereas in spring and early summer plantings, plants devote their energy or “effort” to branching, leafing-out, and flowering, late summer and fall plantings helps new plants devote their energy to establishing robust roots in preparation for overwintering. For this reason, fall is generally seen as the best time to plant shrubs and trees.

Fibrous roots help plants, shrubs and trees establish early on. - Fall tends to be less stressful on new plants. Cool weather keeps soil temperatures lower and can help keep the soil moist for longer — perfect conditions for developing new, sensitive roots. The intense heat of summer can be harsh on new plantings, especially in drought conditions like we had this year. If you planted in the spring, chances are you spent a lot of time watering!
- Many native plants, shrubs and trees have adapted to growing throughout the season, and can still have enough time to take root and establish on the tail end of the growing season. To learn more about why we talk so much about native species, check out our May 2021 Habitat at Home post.
In a sense, planting in late summer and fall is a way to help get your plants, shrubs, and trees further ahead for next spring. By getting a jump on developing a solid foundation of roots, your plants will thrive when spring rains and warmer weather arrive.
Choosing a Location
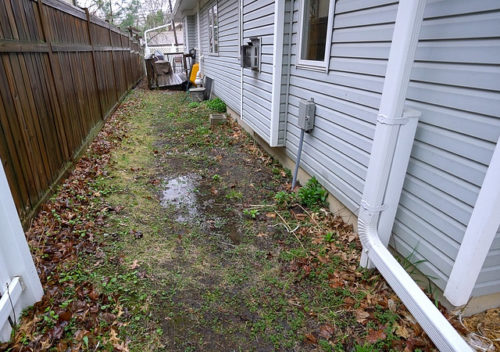
When considering where to put in native plants, it’s good to consider what presently is in your yard or garden. Do you have problem spots where turf just doesn’t seem to grow? Do you have wet spots that remain wet for long periods of time after it rains? What about a dripline or an eroding area? All of these conditions present options for using native plants, which are well suited to establishment when compared to cultivated species and turfgrass. Choosing a location that helps fix a problem might be the best first step.
Another option is to simply choose a spot where you’d like to replace turfgrass. While turf does take in some water, it’s capacity for letting water soak in is very low. Choosing to convert even a small patch of turfgrass into native plants is a great start for both managing stormwater and creating habitat.
A Few Considerations: Light, Water, and Soil
Light is an important consideration when choosing plants and locations. Does the area you want to plant have full sun, partial sun/shade, or full shade? Observing where the sunlight falls throughout the day can be simple way of determining what can survive in that spot.
As for water, it’s important to consider how you can water the planting. Not everyone has a hose that can reach the area in times of drought, so you may be hauling buckets in that case. Native plants don’t need much watering once they’re established, but you’ll want to keep them watered for the first year or two.

You might also want to think about your soils. A percolation test is a simple way to measure how well water soaks into your yard. If your percolation test demonstrates that water doesn’t soak in very well, you could amend your soils with compost or topsoil to improve infiltration. You can always take a soil sample and send it to the University of Minnesota’s lab, which will tell you the composition of your soil (clay, loam, sand, urban fill). In some cases, you may discover that you’ve got a bit more digging to do to fix those soils, but as long as you’re not going really large with your planting, it should be viable for a do-it-yourself fix.
If your yard presents some unique challenges, you might also want to check out The Best Plants for 30 Tough Sites, a free guide from the University of Minnesota Extension Service.
It can be helpful to draw out where things are in your yard (trees, landscaping, existing plants). This can help you think about location. And finally, before you dig, always call Gopher State One to have them map out utilities that may be buried underground.
Putting Your Plants in the Ground
When it’s time to plant, follow these simple steps can to welcome your new plants, shrubs, and trees and set them up for success.
- Dig a hole just larger than the size of the container your plants came in. If you have mulch or landscaping fabric, you’ll want to pull the mulch back and cut through the fabric before digging. In some cases, digging twice the size may help if you’re finding it hard to place plants from larger containers.
- Tease the roots out if they are root-bound. Plants often start building roots up into the soil they’ve been in when in a container. Teasing the roots out so they hang more freely before planting so they reach down further helps them to grow down and out instead of growing up.
- Plant your plants flush with the surface of the soil. If you plant too low or too high, you can impact the roots near the stem of the plant. If planting into a sloped or slanted surface, plant at a 90-degree angle to the soil surface for the same reason.
- Fill in dirt around the roots using the soil you pulled aside.
- Tamp down the soil gently so the plants are not too loosely planted. A gentle tug on the stem can tell you if it’s in the ground firmly.
- Add mulch around the roots in a doughnut shape rather than mounding up around the base stem of the plant. Mulch is a great tool for maintaining moisture and keeping roots warm during cool weather. It also keeps weeds at bay during the growing season, and can add essential nutrients.
- Water the plants soon after planting to help the soil settle and roots kick off their growth in their new home.
- Keep an eye on your plants and monitor how much water they get through rain. Regular watering and monitoring helps your plants establish and helps you notice when things are not going as planned.
In addition to the many benefits listed above, planting in the cool fall weather is also a lovely experience when compared to working in the blazing summer sun. It’s a perfect time to get out and add some native perennials to your yard!
We created a fall planting tutorial video to walk you through some of the steps outlined above. If you have further questions, please feel free to reach out to MWMO staff for support.


